To Install a First Discourse Instance on CloudPanel
To Install a Second Discourse Instance on the Same CloudPanel Server…
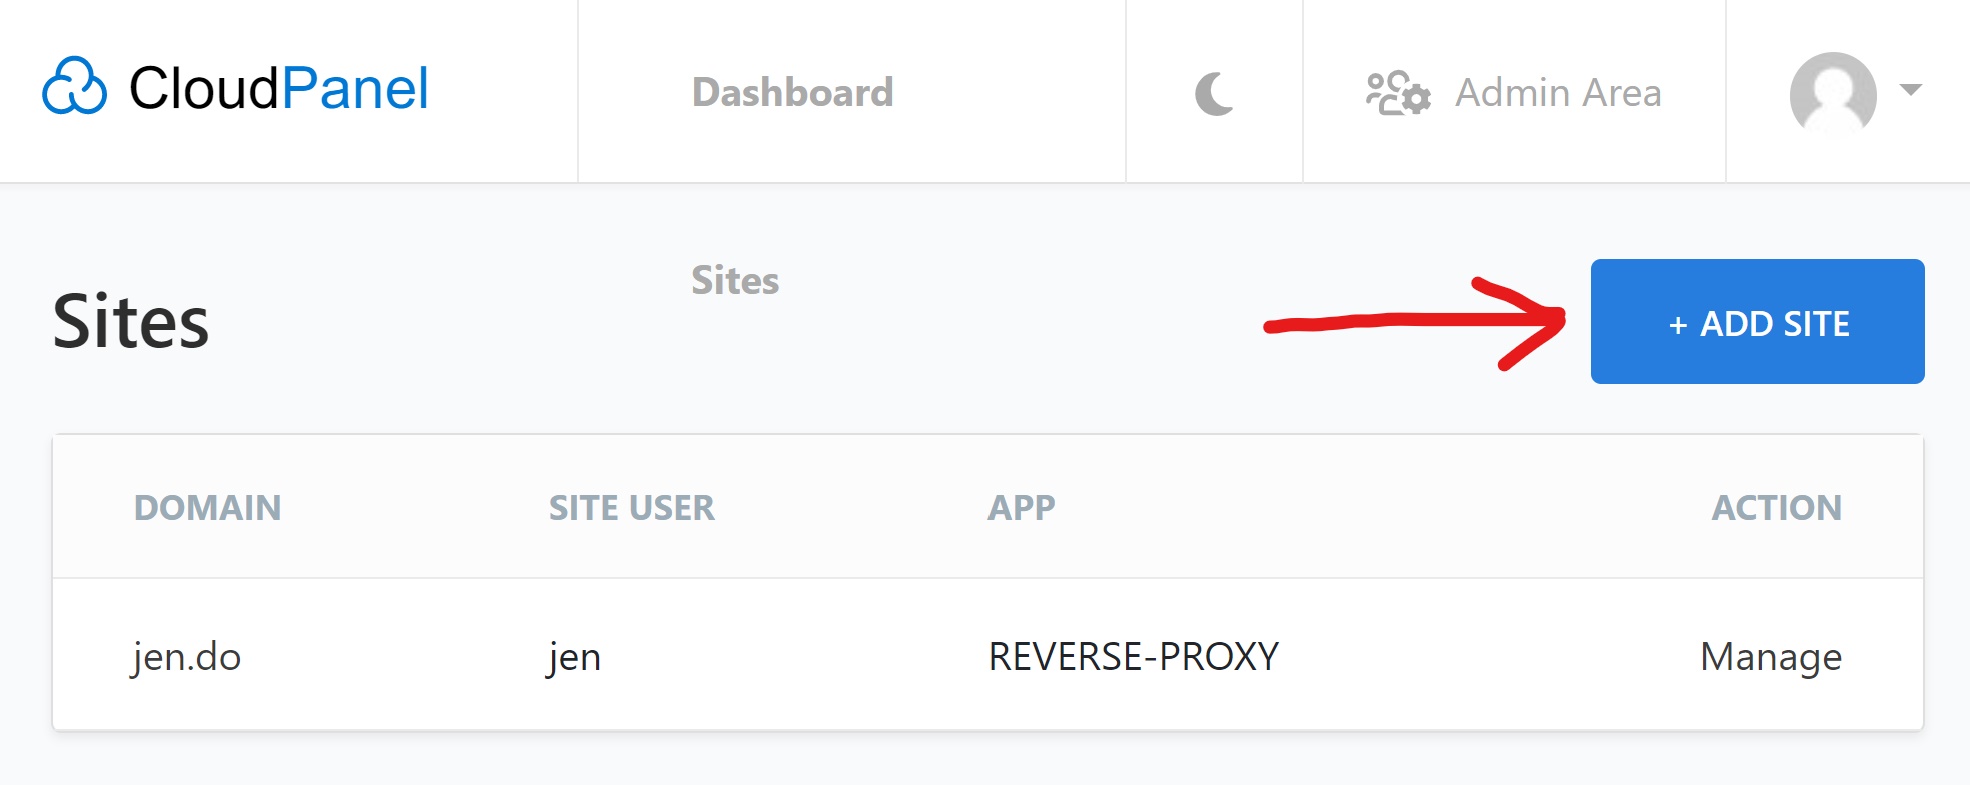
1. Create a Reverse Proxy Site in CloudPanel
In CloudPanel…
Click the + Add Site button…
For my Discourse instance I am using my domain name noobish.me, so from now on wherever you see that in the rest of these instructions, replace noobish.me with your actual domain name.
Next we click create a new “Create a Reverse Proxy” in the CloudPanel for the domain where we want to host our Discourse forum.
Here we type in the Domain Name for our Discourse forum. If we want, we can change the Site User and/or Site User Password, or just accept the defaults provided.


2. Prepare the Domain and Set up SSL (Cloudflare)
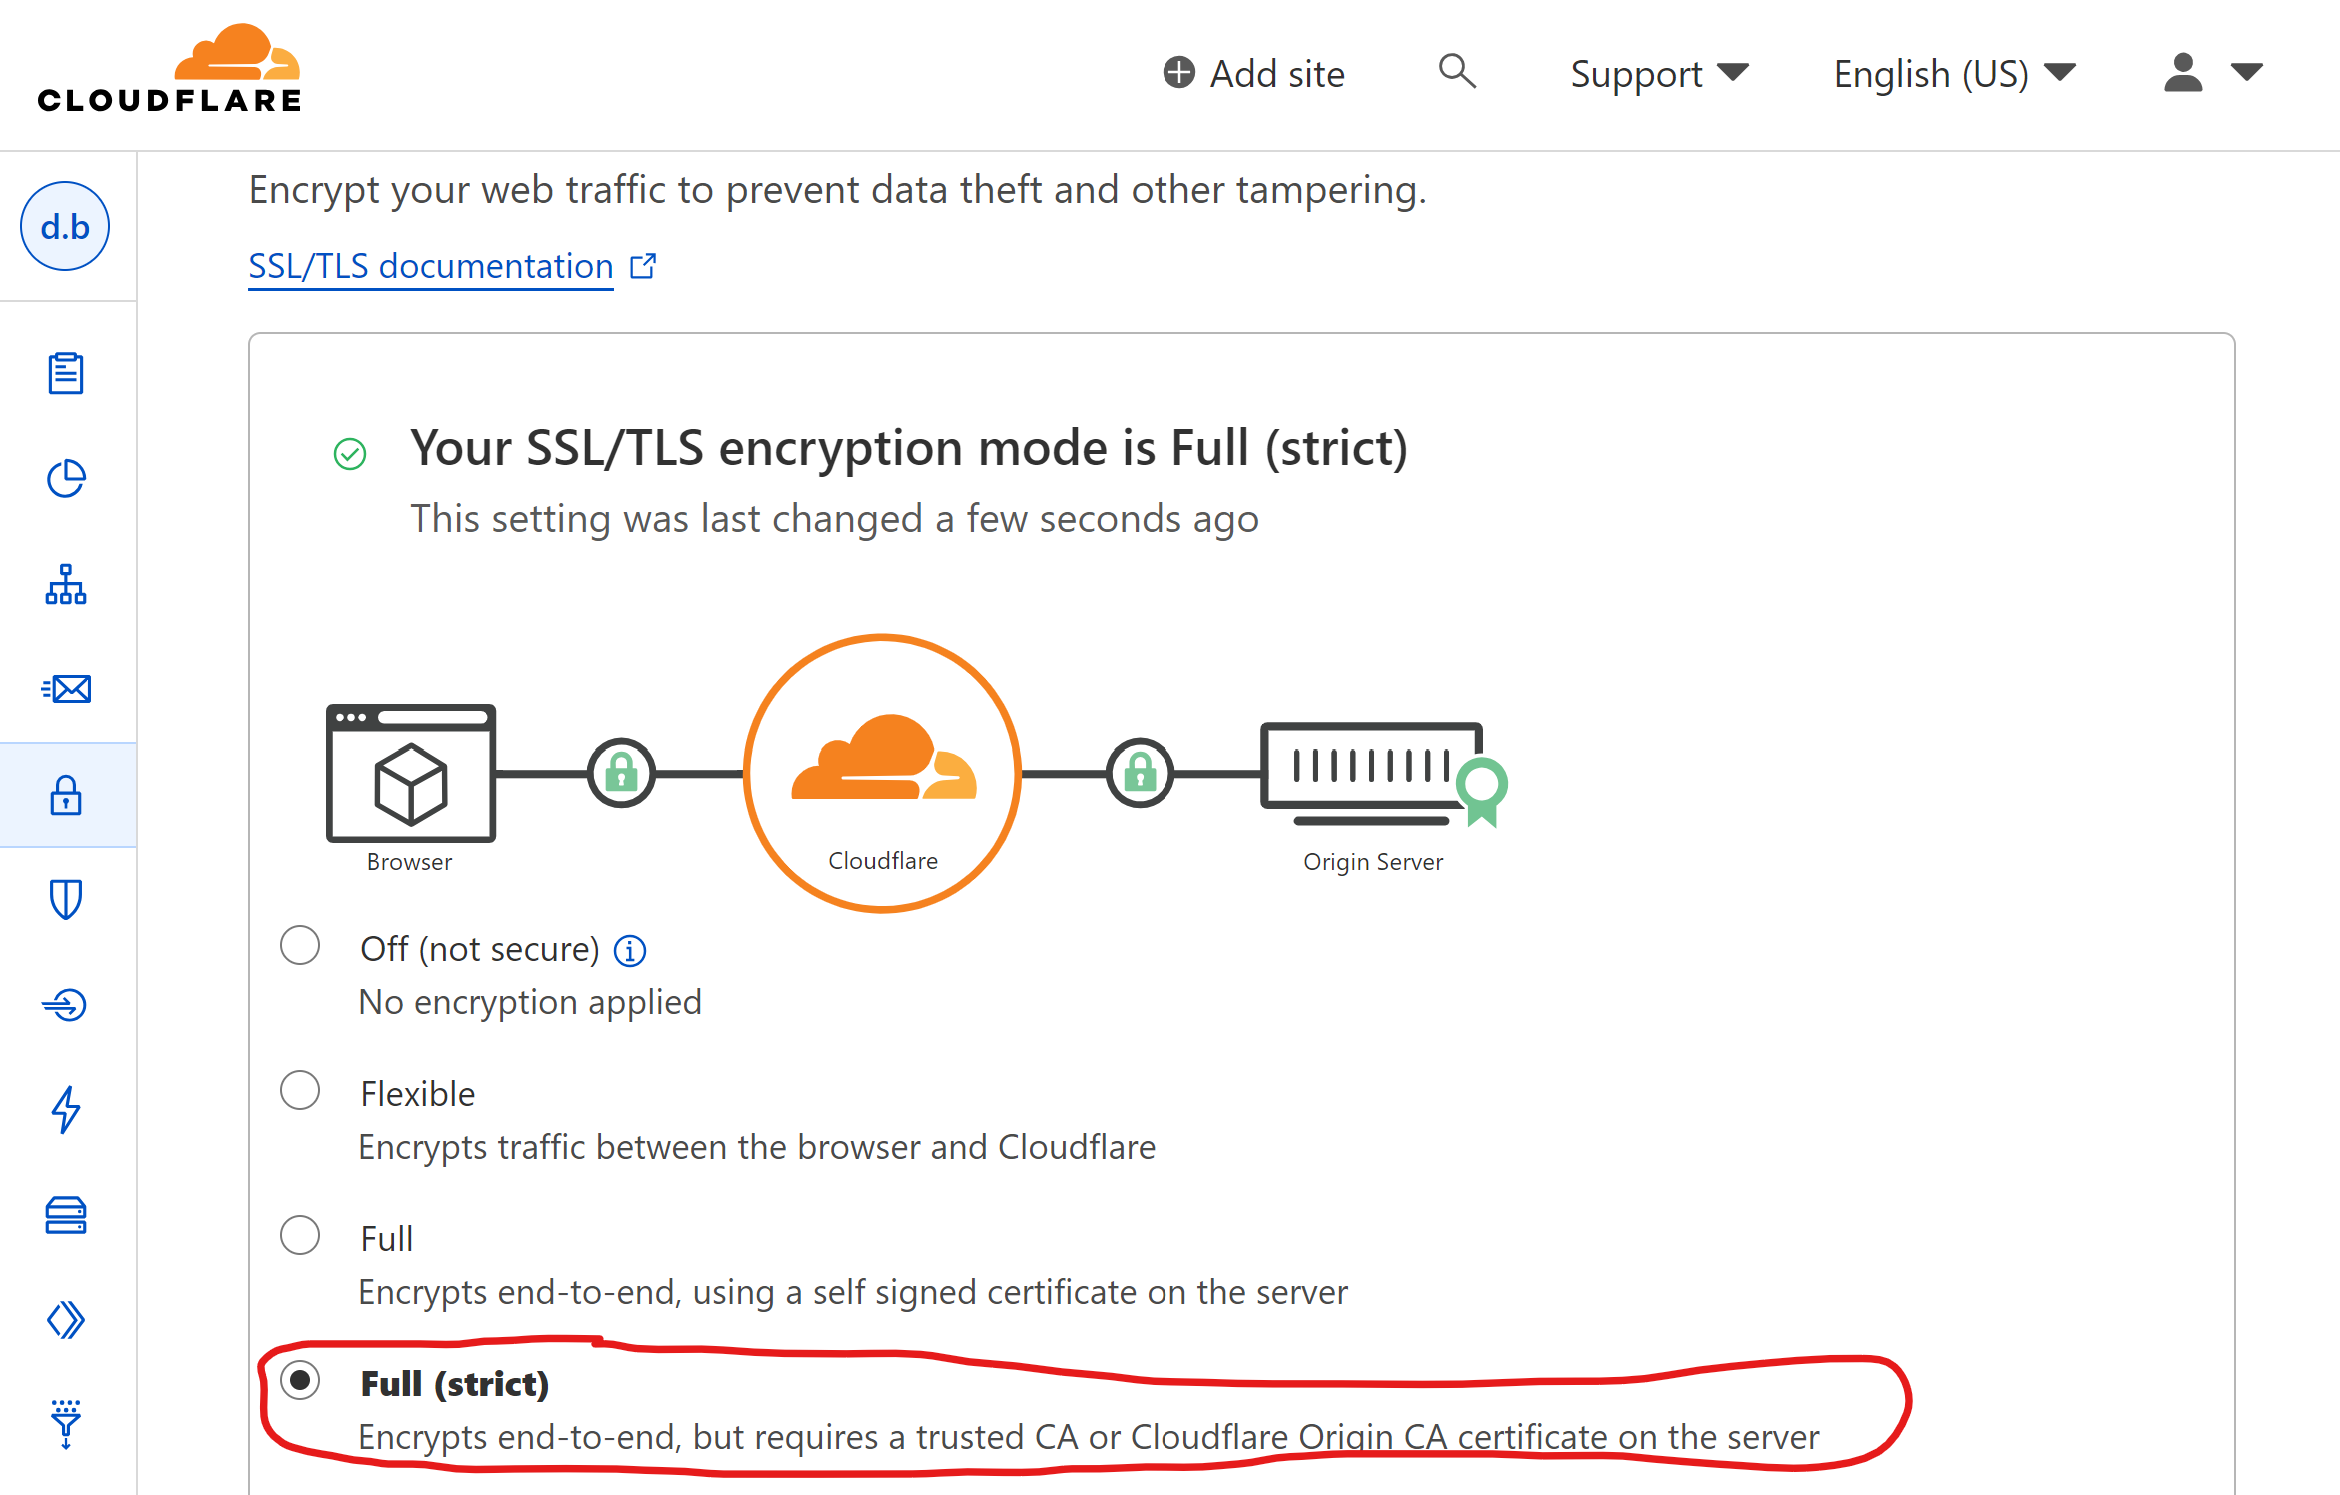
For my site I’m using Cloudflare’s nameservers to point the domain. In Cloudflare I set the SSL to Full or Full (strict).
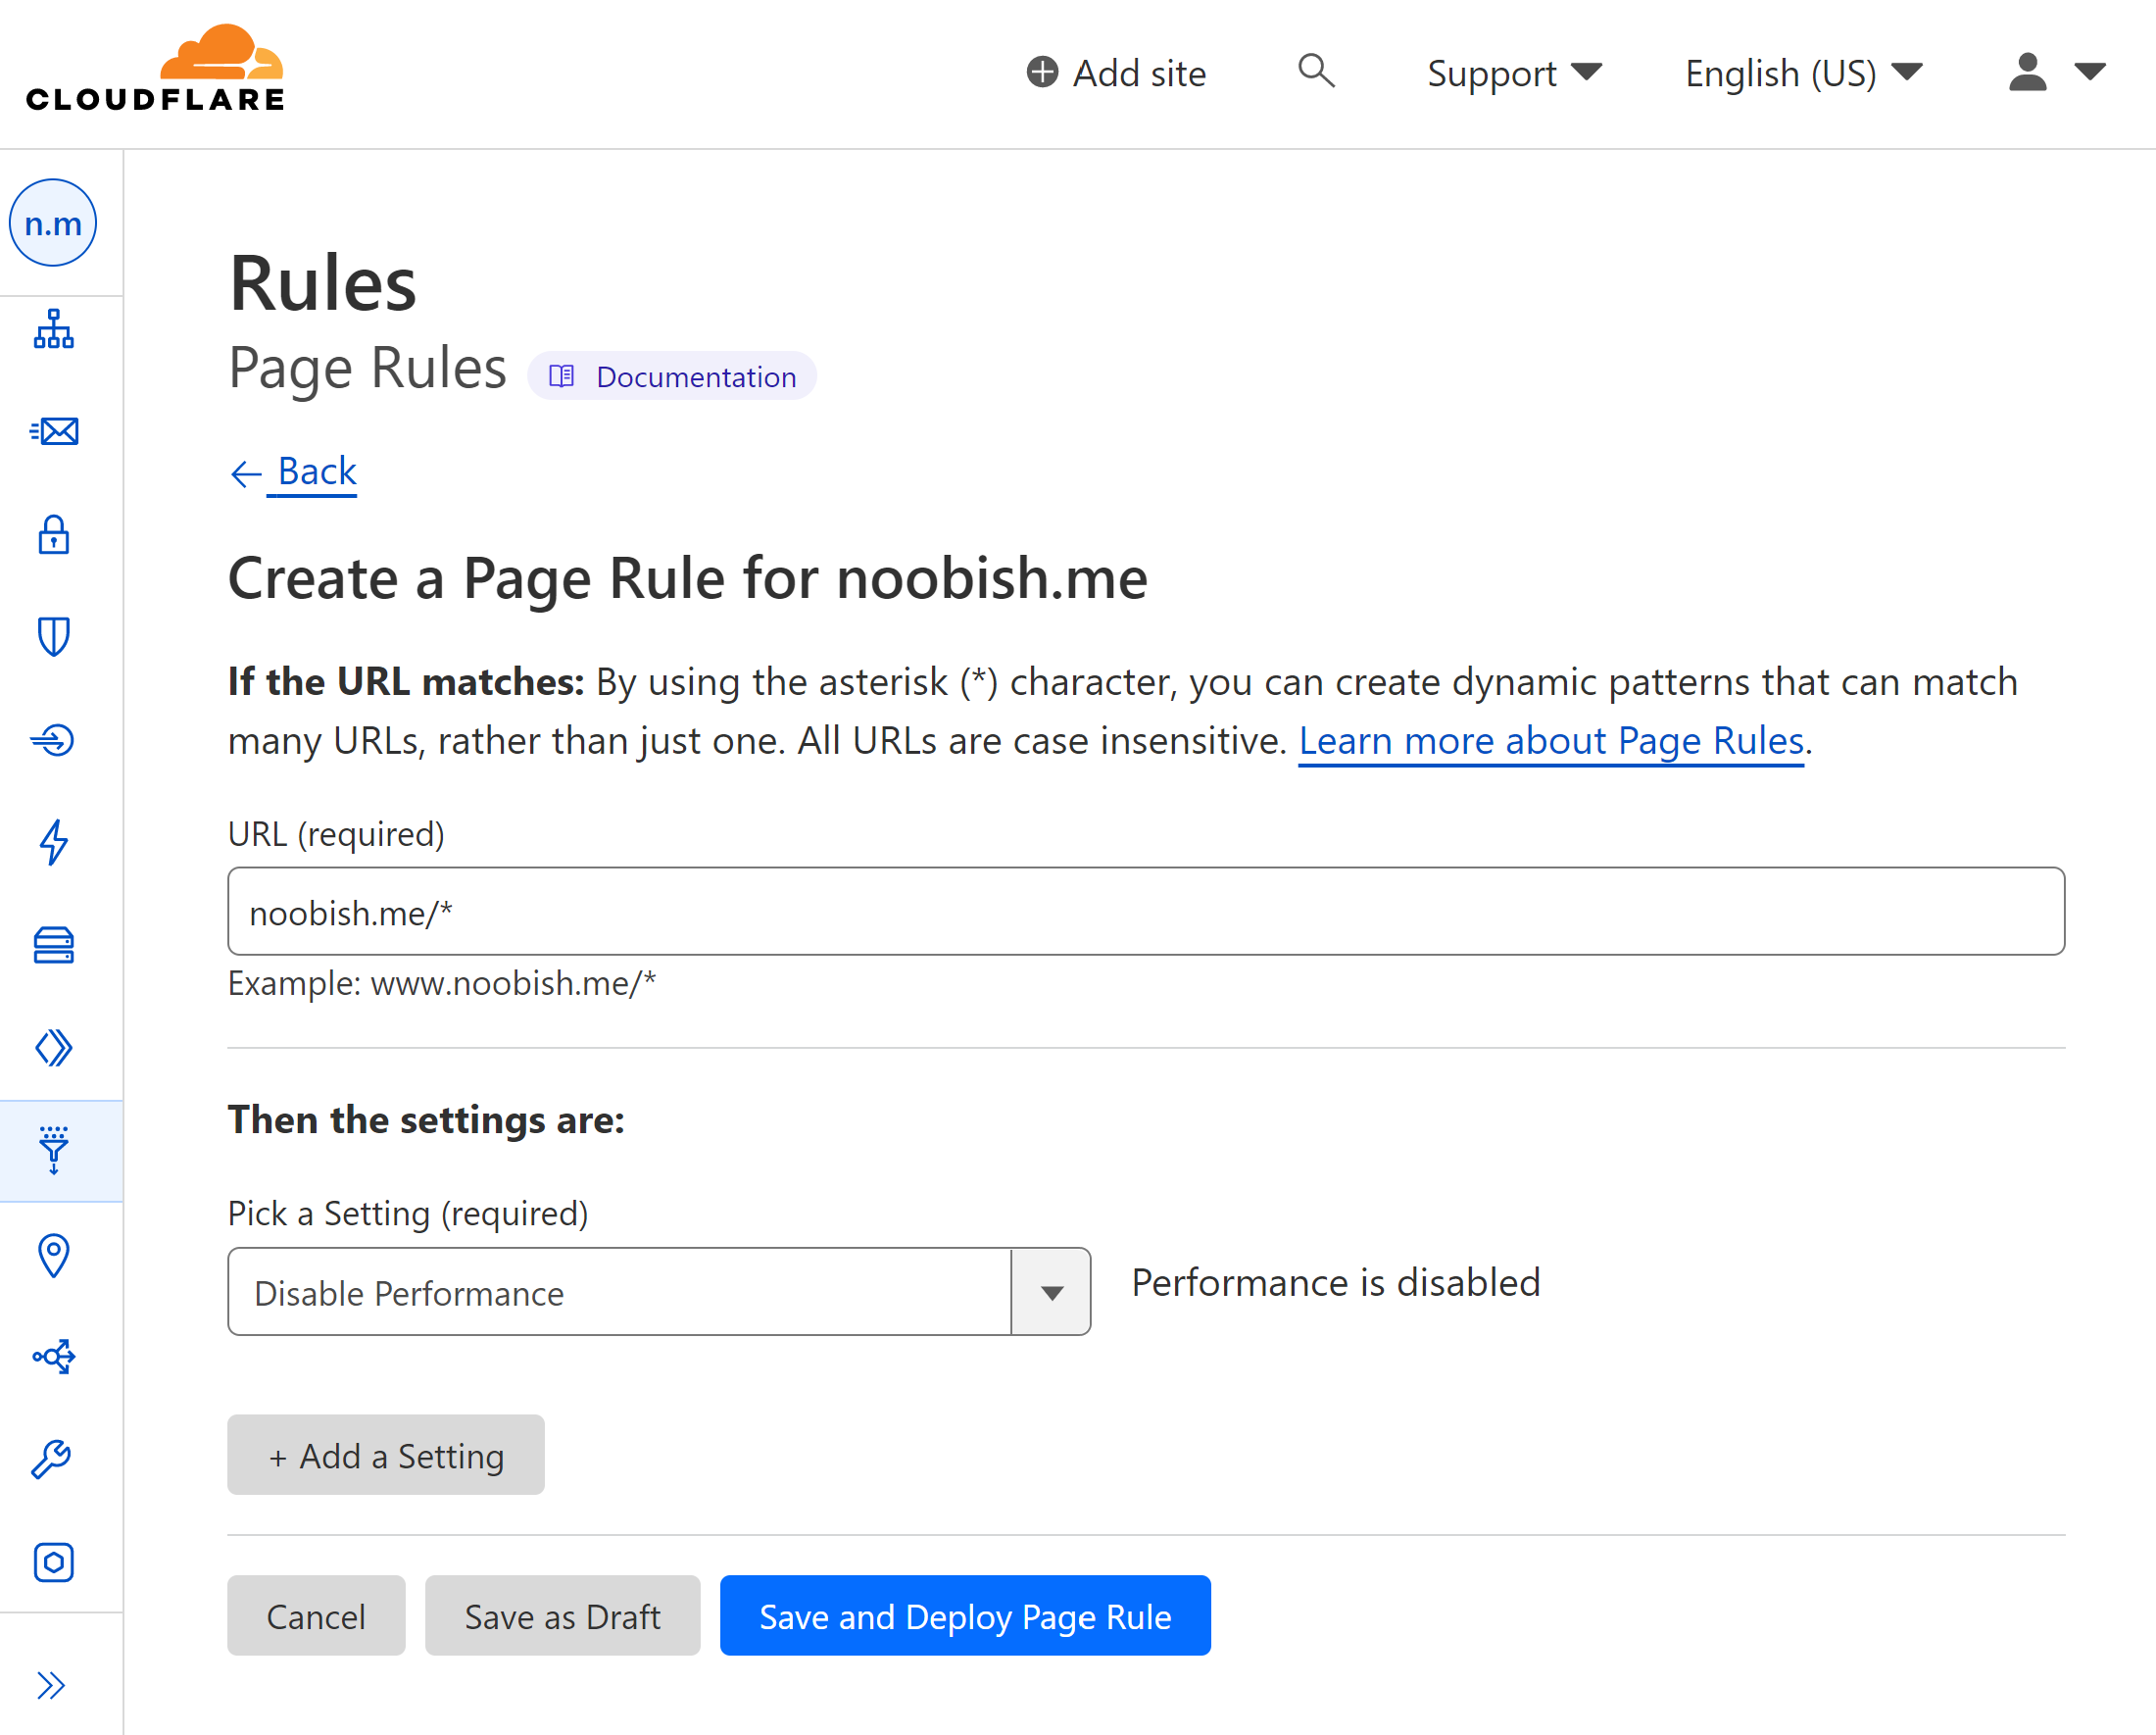
I also create a Cloudflare Page Rule. Visit this post to learn why.
Here is another reference:
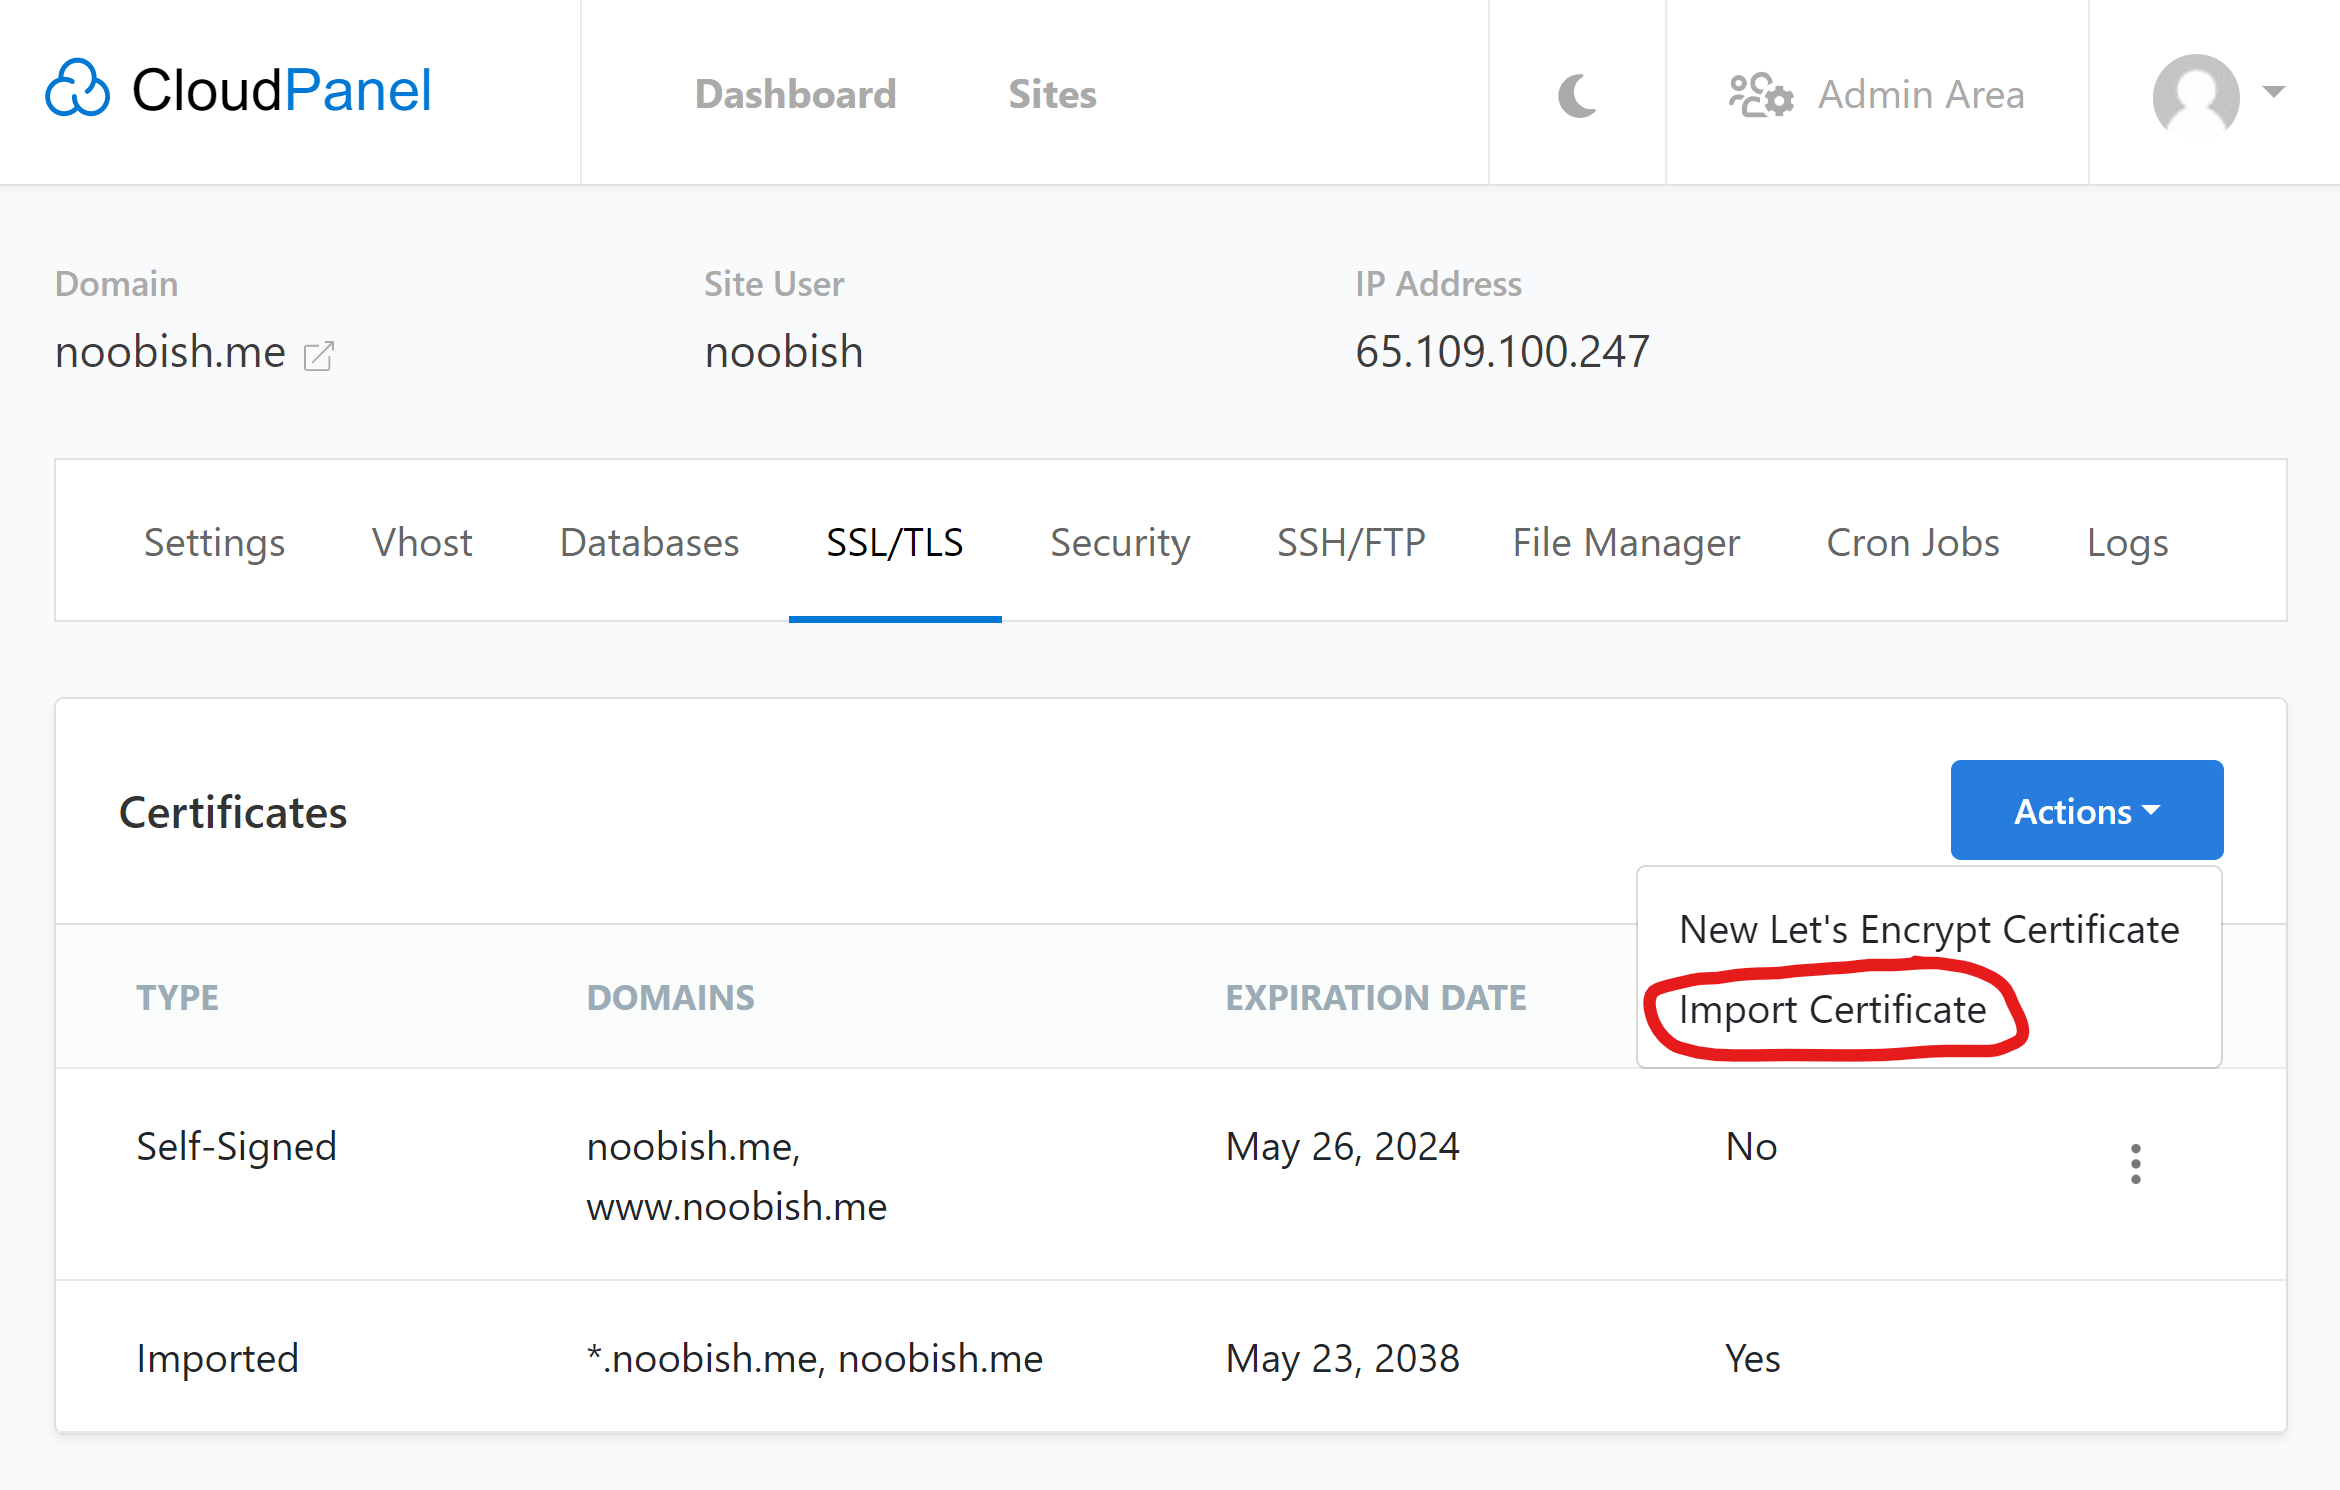
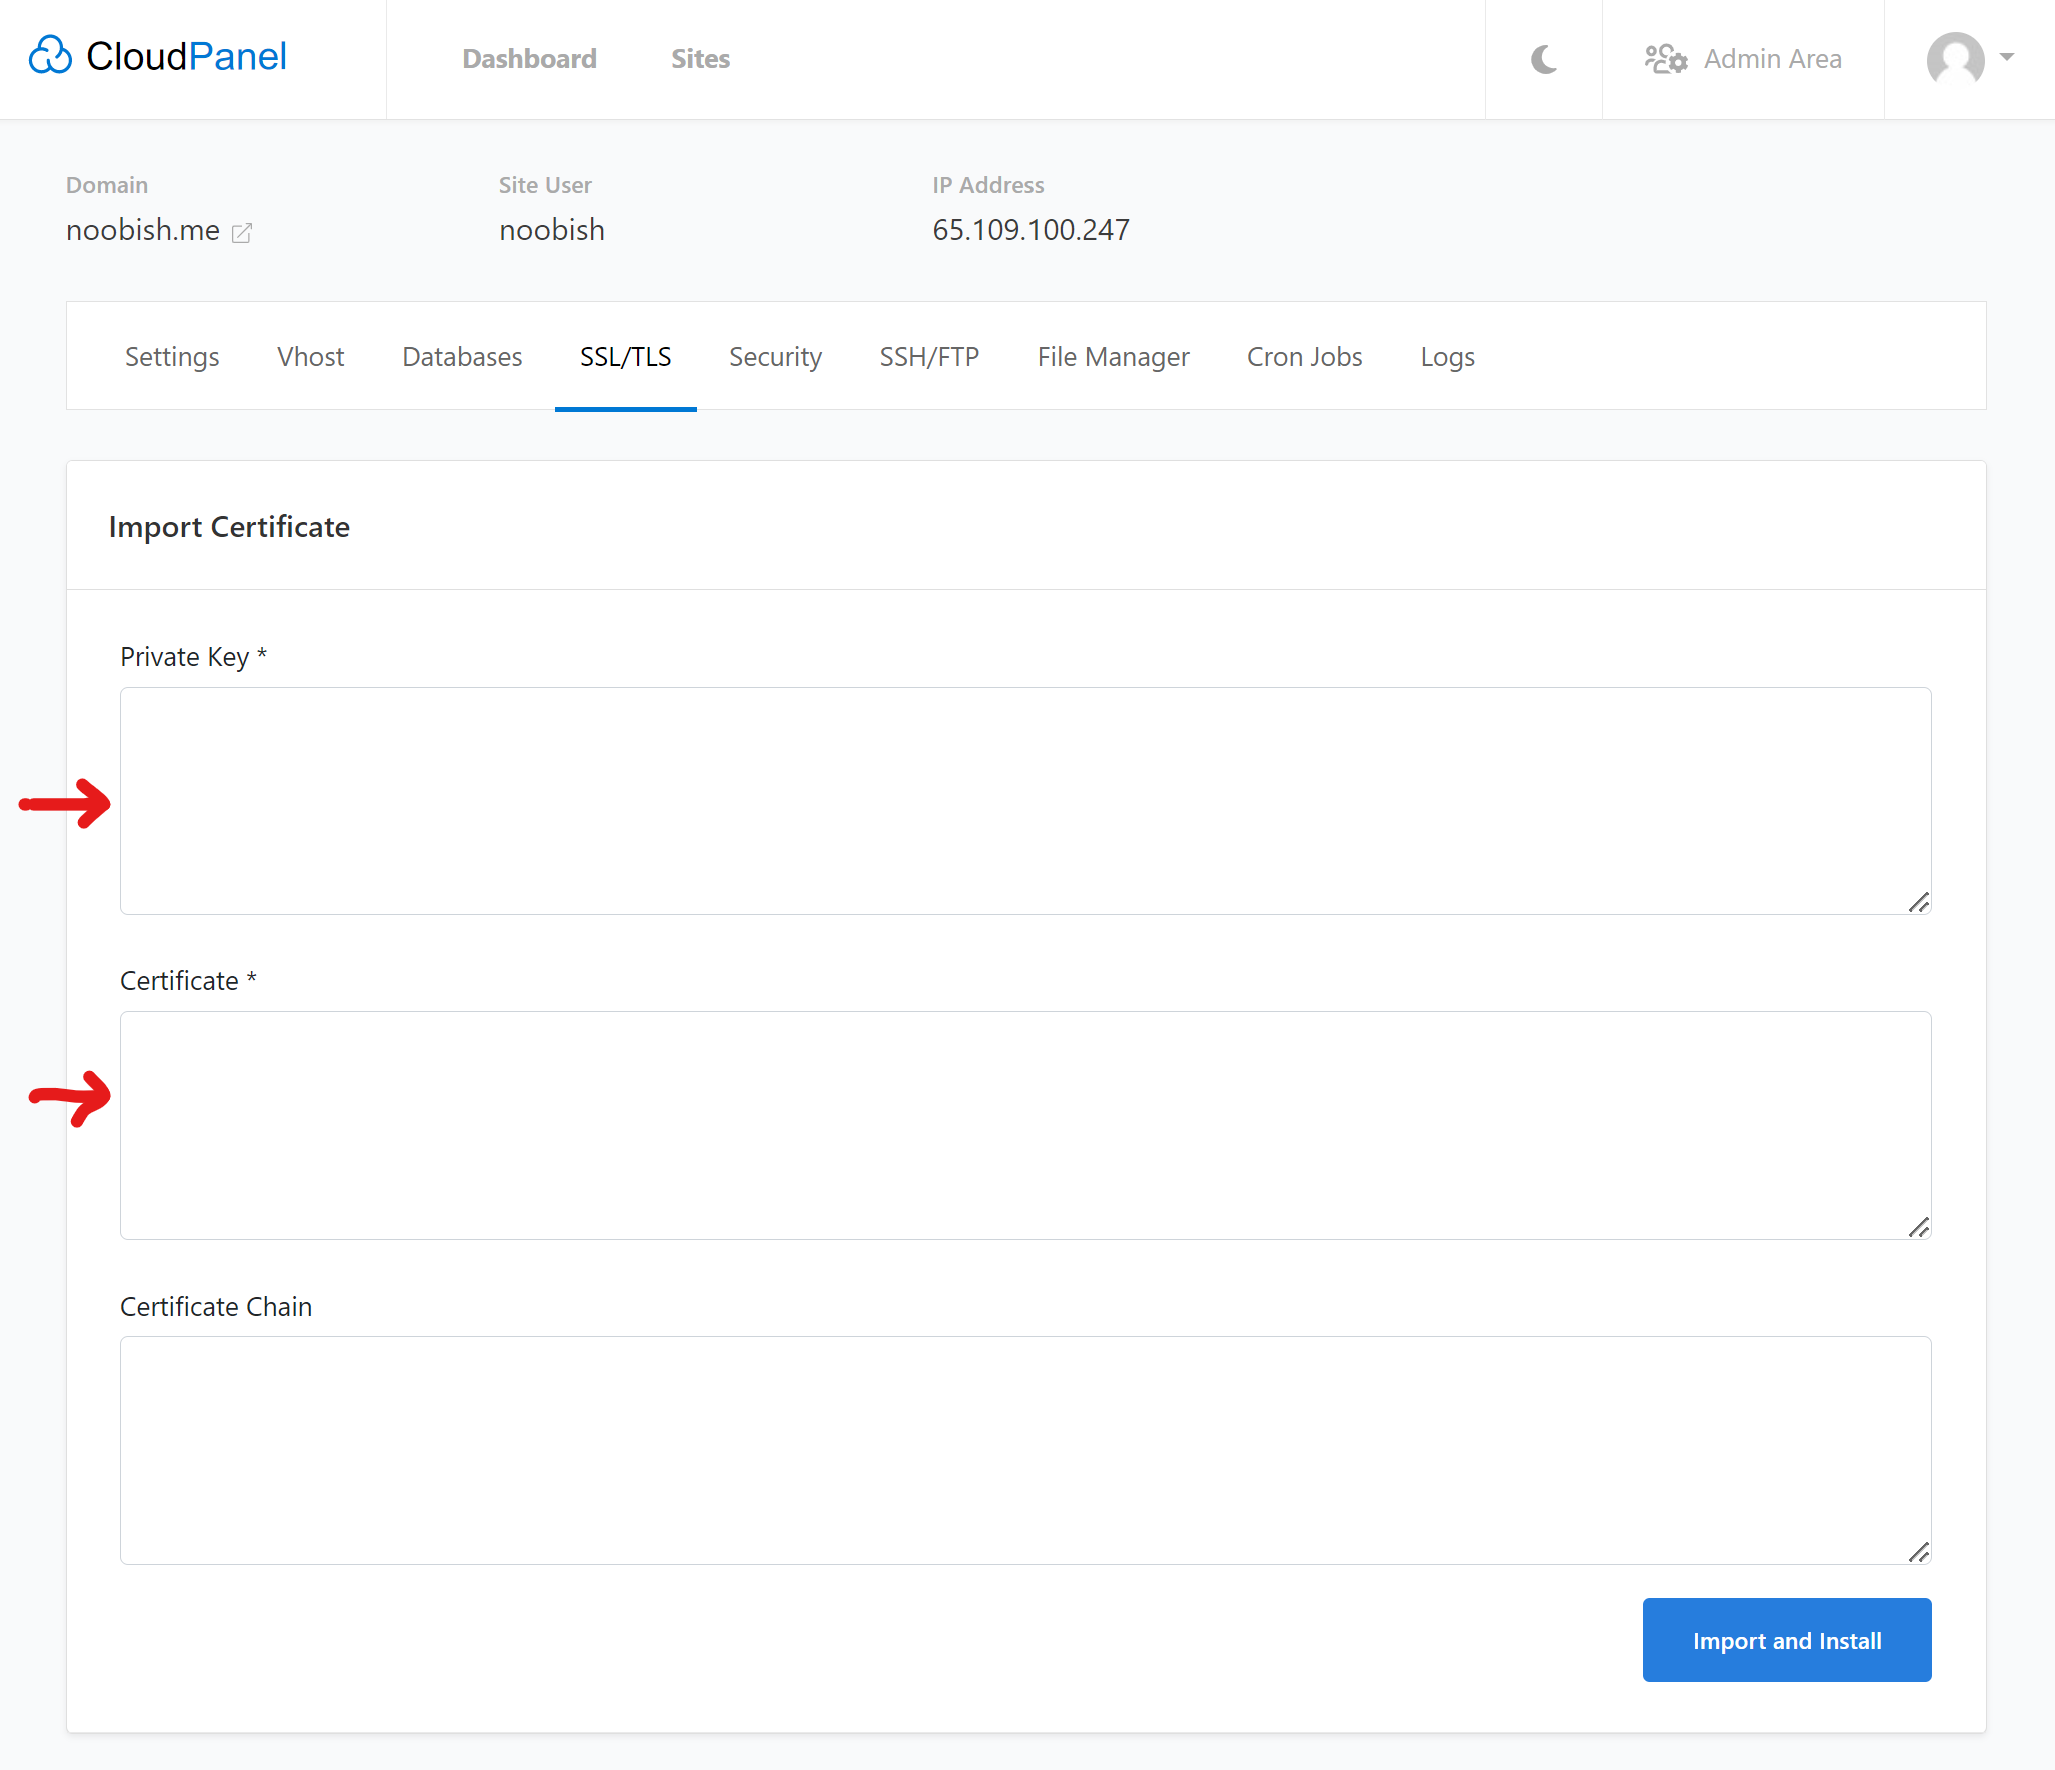
Cloudflare with Discourse: Setup Guide (WAF & Security Rules)I’m also using a free Cloudflare SSL Origin Certificate for my domain, which I “Import” into CloudPanel within the “SSL/TLS” site settings for that site (by simply pasting in both the Certificate and the Private Key I had downloaded for that domain name from my Cloudflare account.)

…and… in Cloudflare, is to prevent the error …
… in Cloudflare we need to …
… and also in Cloudflare we need to do all these other things …
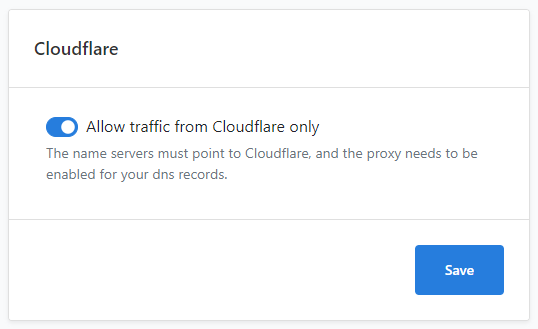
… Then … in CloudPanel (in the Security tab in the Site’s Settings), enable Allow traffic from Cloudflare only…
]
… and in the ENV section of the Discourse app_.yml file (which you will be creating next) …
From: How-to disable or tune rate limiting by ip address? - #2 by pfaffman - Support - Discourse Meta

3. Create and Edit the app2.yml File
Next, back in Putty (or other terminal), as the root user… type
nano /var/discourse/containers/app2.ymlEnter
(This creates the app2.yml file.)
Now we paste in the contents of the below sample app2.yml file, and then edit according to our specific site settings:
Sample of app2.yml (w/Cloudflare & Mailgun) ->
## this is the all-in-one, standalone Discourse Docker container template
##
## After making changes to this file, you MUST rebuild
## /var/discourse/launcher rebuild app
##
## BE *VERY* CAREFUL WHEN EDITING!
## YAML FILES ARE SUPER SUPER SENSITIVE TO MISTAKES IN WHITESPACE OR ALIGNMENT!
## visit http://www.yamllint.com/ to validate this file as needed

templates:
  - "templates/postgres.template.yml"
  - "templates/redis.template.yml"
  - "templates/web.template.yml"
  ## Uncomment the next line to enable the IPv6 listener
  #- "templates/web.ipv6.template.yml"
  - "templates/web.ratelimited.template.yml"
  ## Uncomment these two lines if you wish to add Lets Encrypt (https)
  #- "templates/web.ssl.template.yml"
  #- "templates/web.letsencrypt.ssl.template.yml"
  - "templates/web.socketed.template.yml"
  - "templates/cloudflare.template.yml"

## which TCP/IP ports should this container expose?
## If you want Discourse to share a port with another webserver like Apache or nginx,
## see https://meta.discourse.org/t/17247 for details
expose:
  #- "80:80"   # http
  #- "443:443" # https

params:
  db_default_text_search_config: "pg_catalog.english"

  ## Set db_shared_buffers to a max of 25% of the total memory.
  ## will be set automatically by bootstrap based on detected RAM, or you can override
  #db_shared_buffers: "256MB"

  ## can improve sorting performance, but adds memory usage per-connection
  #db_work_mem: "40MB"

  ## Which Git revision should this container use? (default: tests-passed)
  #version: tests-passed

env:
  LC_ALL: en_US.UTF-8
  LANG: en_US.UTF-8
  LANGUAGE: en_US.UTF-8

  DISCOURSE_FORCE_HTTPS: true
  DISCOURSE_MAX_REQS_PER_IP_PER_10_SECONDS: 200
  DISCOURSE_MAX_REQS_PER_IP_PER_MINUTE: 400

  # DISCOURSE_DEFAULT_LOCALE: en

  ## How many concurrent web requests are supported? Depends on memory and CPU cores.
  ## will be set automatically by bootstrap based on detected CPUs, or you can override
  #UNICORN_WORKERS: 3

  ## TODO: The domain name this Discourse instance will respond to
  ## Required. Discourse will not work with a bare IP number.
  DISCOURSE_HOSTNAME: 'noobish.me'

  ## Uncomment if you want the container to be started with the same
  ## hostname (-h option) as specified above (default "$hostname-$config")
  #DOCKER_USE_HOSTNAME: true

  ## TODO: List of comma delimited emails that will be made admin and developer
  ## on initial signup example 'user1@example.com,user2@example.com'
  DISCOURSE_DEVELOPER_EMAILS: 'admin@noobish.me'

  ## TODO: The SMTP mail server used to validate new accounts and send notifications
  # SMTP ADDRESS, username, and password are required
  # WARNING the char '#' in SMTP password can cause problems!
  DISCOURSE_SMTP_ADDRESS: smtp.mailgun.org
  DISCOURSE_SMTP_PORT: 587
  DISCOURSE_SMTP_USER_NAME: postmaster@noobish.me
  DISCOURSE_SMTP_PASSWORD: xxxxxxxxxx
  #DISCOURSE_SMTP_ENABLE_START_TLS: true           # (optional, default true)
  #DISCOURSE_SMTP_DOMAIN: discourse.example.com    # (required by some providers)
  DISCOURSE_NOTIFICATION_EMAIL: noreply@noobish.me    # (address to send notifications from)

  ## If you added the Lets Encrypt template, uncomment below to get a free SSL certificate
  #LETSENCRYPT_ACCOUNT_EMAIL: me@example.com

  ## The http or https CDN address for this Discourse instance (configured to pull)
  ## see https://meta.discourse.org/t/14857 for details
  #DISCOURSE_CDN_URL: https://discourse-cdn.example.com

  ## The maxmind geolocation IP address key for IP address lookup
  ## see https://meta.discourse.org/t/-/137387/23 for details
  DISCOURSE_MAXMIND_LICENSE_KEY: xxxxxxxxxxxxxxxxxxx

## The Docker container is stateless; all data is stored in /shared
volumes:
  - volume:
      host: /var/discourse/shared/standalone2
      guest: /shared
  - volume:
      host: /var/discourse/shared/standalone2/log/var-log
      guest: /var/log

## Plugins go here
## see https://meta.discourse.org/t/19157 for details
hooks:
  after_code:
    - exec:
        cd: $home/plugins
        cmd:
          - git clone https://github.com/discourse/docker_manager.git
          - git clone https://github.com/discourse/discourse-ai.git
          - git clone https://github.com/merefield/discourse-ai-topic-summary.git
          - git clone https://github.com/discourse/discourse-akismet.git
          - git clone https://github.com/discourse/discourse-bbcode.git
          - git clone https://github.com/discourse/discourse-categories-suppressed.git
          - git clone https://github.com/discourse/discourse-characters-required.git
          - git clone https://github.com/discourse/discourse-docs.git
          - git clone https://github.com/discourse/discourse-follow.git
          - git clone https://github.com/MonDiscourse/discourse-formatting-toolbar.git
          - git clone https://github.com/discourse/discourse-gamification.git
          - git clone https://github.com/paviliondev/discourse-group-directory.git
          - git clone https://github.com/discourse/discourse-group-tag-associations.git
          - git clone https://github.com/discourse/discourse-group-tracker.git
          - git clone https://github.com/discourse/discourse-nested-posts.git
          - git clone https://github.com/paviliondev/discourse-news.git
          - git clone https://github.com/thoka/discourse-send-pdf-inline.git
          - git clone https://github.com/discourse/discourse-prepend-tags-in-topic-slug.git
          - git clone https://github.com/discourse/discourse-reactions.git
          - git clone https://github.com/discourse/discourse-restricted-replies.git
          - git clone https://github.com/discourse/discourse-rss-polling.git
          - git clone https://github.com/discourse/discourse-saved-searches.git
          - git clone https://github.com/discourse/discourse-solved.git
          - git clone https://github.com/discourse/discourse-staff-alias.git
          - git clone https://github.com/discourse/discourse-subscriptions.git
          - git clone https://github.com/discourse/discourse-surveys.git
          - git clone https://github.com/discourse/discourse-templates.git
          - git clone https://github.com/discourse/discourse-tooltips.git
          - git clone https://github.com/discourse/discourse-topic-voting.git
#          - git clone https://github.com/merefield/discourse-word-cloud.git
#          - git clone https://github.com/communiteq/discourse-private-replies.git

## Any custom commands to run after building
run:
  - exec: echo "Beginning of custom commands"
  - exec: rails r "SiteSetting.max_category_nesting=3"
  - exec: rails r "SiteSetting.allow_embedding_site_in_an_iframe=true"
  - exec: rails r "SiteSetting.can_permanently_delete=true"
  ## If you want to set the 'From' email address for your first registration, uncomment and change:
  ## After getting the first signup email, re-comment the line. It only needs to run once.
  #- exec: rails r "SiteSetting.notification_email='info@unconfigured.discourse.org'"
  - exec: echo "End of custom commands"
Under the section env: we need to change the line
DISCOURSE_HOSTNAME: noobish.me
(replacing noobish.me with the URL of our Discourse site);Also, we need to replace the email settings for our specific site;
And finally, under the section volumes: we need to replace both instances of the number 2 in standalone2 to match the number of our app_.yml file.
→ After making our changes we save and exit the app2.yml file…
CTRL-X
y
Enter
4. Set the Permissions for the app2.yml File
Next, still in the terminal, we set the permissions for the app2.yml file…
chmod o-rwx /var/discourse/containers/app2.ymlEnter
then…
5. Bootstrap the app2 App
cd /var/discourseEnter
./launcher bootstrap app2Enter
This will take 5 - 10 minutes.
While we are waiting for the app to bootstrap, we…
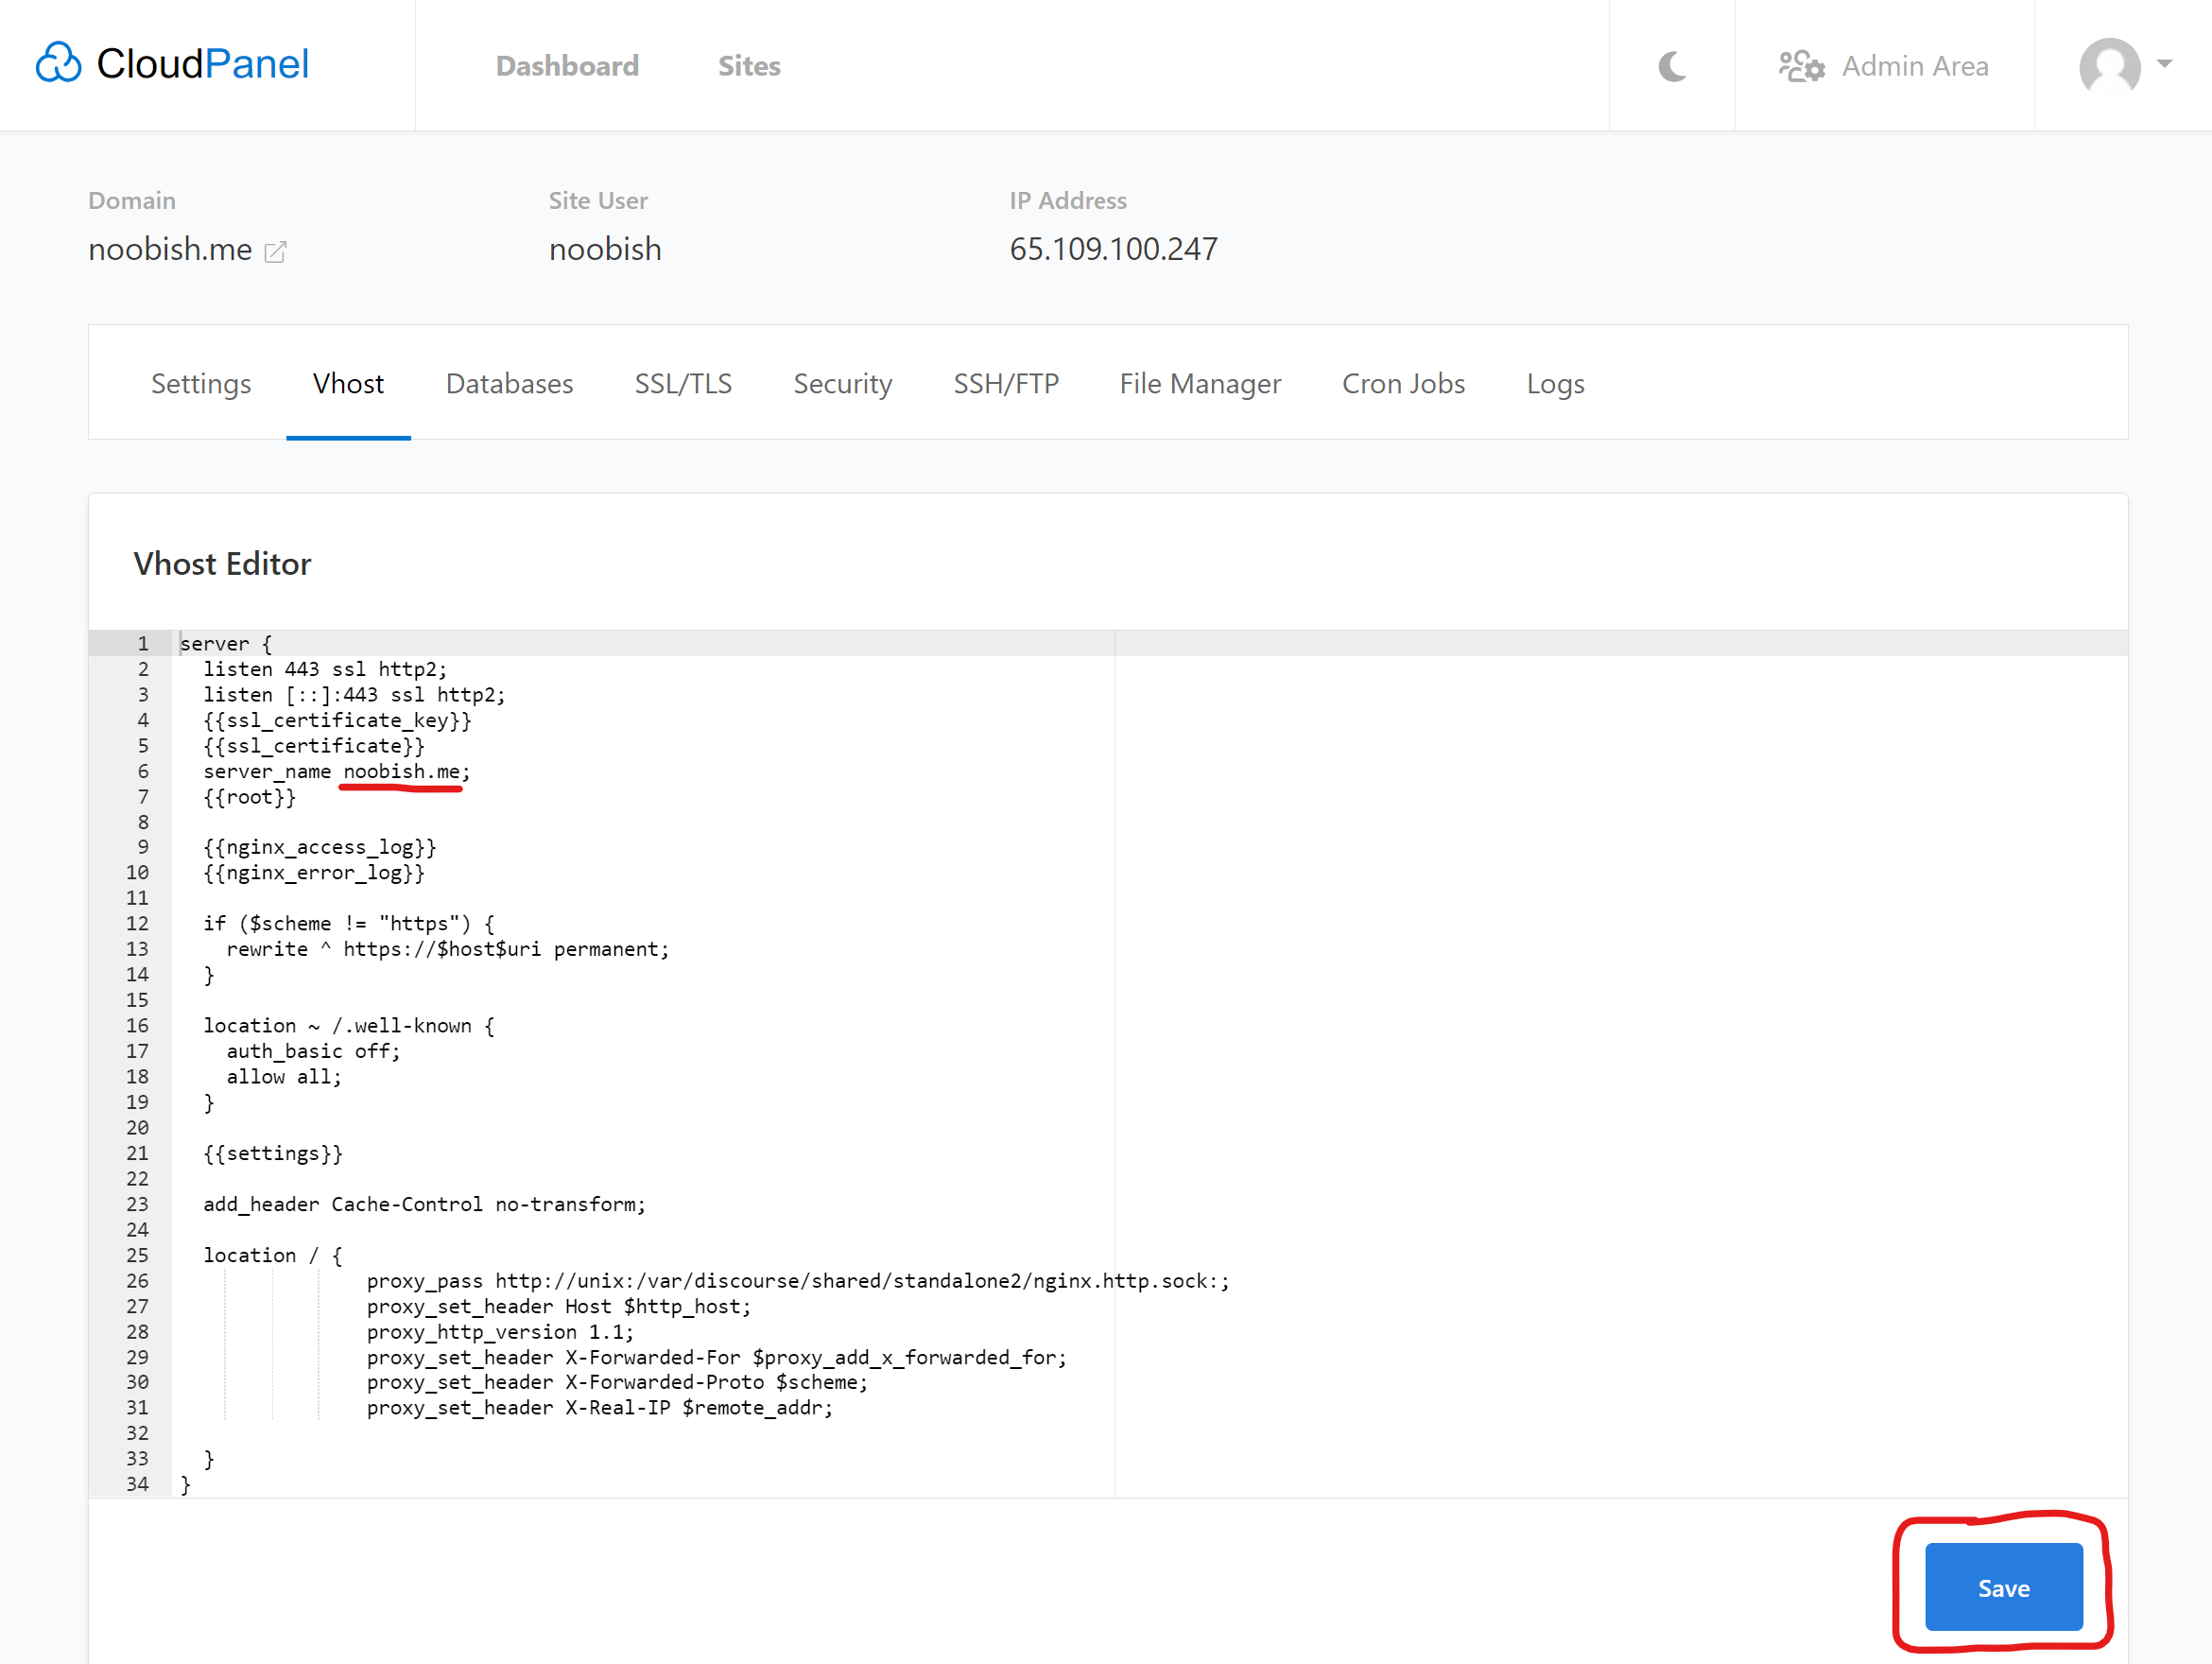
6. Edit the Vhost File
Back in our CloudPanel site settings we paste the below Sample Vhost Contents into the “Vhost Editor” for our Discourse site (overwriting what is already there).
Sample Vhost Contents
server {
#  listen 80;
#  listen [::]:80;
  listen 443 ssl http2;
  listen [::]:443 ssl http2;
  {{ssl_certificate_key}}
  {{ssl_certificate}}
  server_name www.noobish.me;
  return 301 https://noobish.me$request_uri;
}

server {
#  listen 80;
#  listen [::]:80;
  listen 443 ssl http2;
  listen [::]:443 ssl http2;
  {{ssl_certificate_key}}
  {{ssl_certificate}}
  server_name noobish.me www1.noobish.me;
  {{root}}

  {{nginx_access_log}}
  {{nginx_error_log}}

  if ($scheme != "https") {
    rewrite ^ https://$host$uri permanent;
  }

  location @reverse_proxy {
    proxy_pass {{reverse_proxy_url}};
    proxy_http_version 1.1;
    proxy_set_header X-Forwarded-Host $host;
    proxy_set_header X-Forwarded-Server $host;
    proxy_set_header X-Real-IP $remote_addr;
    proxy_set_header X-Forwarded-For $proxy_add_x_forwarded_for;
    proxy_set_header X-Forwarded-Proto $scheme;
    proxy_set_header Host $http_host;
    proxy_set_header Upgrade $http_upgrade;
    proxy_set_header Connection "Upgrade";
    proxy_pass_request_headers on;
    proxy_max_temp_file_size 0;
    proxy_connect_timeout 900;
    proxy_send_timeout 900;
    proxy_read_timeout 900;
    proxy_buffer_size 128k;
    proxy_buffers 4 256k;
    proxy_busy_buffers_size 256k;
    proxy_temp_file_write_size 256k;
  }

  {{settings}}

  add_header Cache-Control no-transform;

  location / {
                proxy_pass http://unix:/var/discourse/shared/standalone2/nginx.http.sock:;
                proxy_set_header Host $http_host;
                proxy_http_version 1.1;
                proxy_set_header X-Forwarded-For $proxy_add_x_forwarded_for;
                proxy_set_header X-Forwarded-Proto $scheme;
                proxy_set_header X-Real-IP $remote_addr;

  }
}
Of course in the Vhost file we replace all 4 instances of noobish.me with the actual URL of our new CloudPanel site from above;
(Then, don’t forget to Save the Vhost settings.)
7. Next, Launch Start
Back in the terminal, at the end of the bootstrap process, you’ll be asked if you want to (and you do, so type in)…
./launcher start app2Enter
Sidenote: When using a Cloudflare Origin SSL Certificate I find that (for some unknown reason) I need to go into Cloudflare SSL and change the encryption mode to Full, and then back again to Full (Strict) to prevent an error (err_ssl_version_or_cipher_mismatch).
So…
And then…

Enjoy Your Second Discourse!
Go to the URL of your new site, and you should see this…

For More Discourse Instances…
Follow this tutorial, changing every instance of (for example) app2 to app3, app2.yml to app3.yml, and standalone2 to standalone3.
On your CloudPanel, using this method, you can install as many Discourse instances as your CloudPanel server can handle!
2024-10-23 Jen's Sample Contents for app3.yml
## this is the all-in-one, standalone Discourse Docker container template
##
## After making changes to this file, you MUST rebuild
## /var/discourse/launcher rebuild app
##
## BE *VERY* CAREFUL WHEN EDITING!
## YAML FILES ARE SUPER SUPER SENSITIVE TO MISTAKES IN WHITESPACE OR ALIGNMENT!
## visit http://www.yamllint.com/ to validate this file as needed

templates:
  - "templates/postgres.template.yml"
  - "templates/redis.template.yml"
  - "templates/web.template.yml"
  ## Uncomment the next line to enable the IPv6 listener
  #- "templates/web.ipv6.template.yml"
  - "templates/web.ratelimited.template.yml"
  ## Uncomment these two lines if you wish to add Lets Encrypt (https)
  #- "templates/web.ssl.template.yml"
  #- "templates/web.letsencrypt.ssl.template.yml"
  - "templates/web.socketed.template.yml"
  - "templates/cloudflare.template.yml"

## which TCP/IP ports should this container expose?
## If you want Discourse to share a port with another webserver like Apache or nginx,
## see https://meta.discourse.org/t/17247 for details
expose:
  #- "80:80"   # http
  #- "443:443" # https

params:
  db_default_text_search_config: "pg_catalog.english"

  ## Set db_shared_buffers to a max of 25% of the total memory.
  ## will be set automatically by bootstrap based on detected RAM, or you can override
  #db_shared_buffers: "256MB"

  ## can improve sorting performance, but adds memory usage per-connection
  #db_work_mem: "40MB"

  ## Which Git revision should this container use? (default: tests-passed)
  #version: tests-passed

env:
  LC_ALL: en_US.UTF-8
  LANG: en_US.UTF-8
  LANGUAGE: en_US.UTF-8

  DISCOURSE_FORCE_HTTPS: true
  DISCOURSE_MAX_REQS_PER_IP_PER_10_SECONDS: 200
  DISCOURSE_MAX_REQS_PER_IP_PER_MINUTE: 400

  # DISCOURSE_DEFAULT_LOCALE: en

  ## How many concurrent web requests are supported? Depends on memory and CPU cores.
  ## will be set automatically by bootstrap based on detected CPUs, or you can override
  #UNICORN_WORKERS: 3

  ## TODO: The domain name this Discourse instance will respond to
  ## Required. Discourse will not work with a bare IP number.
  DISCOURSE_HOSTNAME: 'discourse.pub'

  ## Uncomment if you want the container to be started with the same
  ## hostname (-h option) as specified above (default "$hostname-$config")
  #DOCKER_USE_HOSTNAME: true

  ## TODO: List of comma delimited emails that will be made admin and developer
  ## on initial signup example 'user1@example.com,user2@example.com'
  DISCOURSE_DEVELOPER_EMAILS: 'admin@discourse.pub'

  ## TODO: The SMTP mail server used to validate new accounts and send notifications
  # SMTP ADDRESS, username, and password are required
  # WARNING the char '#' in SMTP password can cause problems!
  DISCOURSE_SMTP_ADDRESS: smtp.mailgun.org
  DISCOURSE_SMTP_PORT: 587
  DISCOURSE_SMTP_USER_NAME: postmaster@discourse.pub
  DISCOURSE_SMTP_PASSWORD: xxxxxxxxxxxx
  #DISCOURSE_SMTP_ENABLE_START_TLS: true           # (optional, default true)
  #DISCOURSE_SMTP_DOMAIN: discourse.example.com    # (required by some providers)
  DISCOURSE_NOTIFICATION_EMAIL: noreply@discourse.pub    # (address to send notifications from)

  ## If you added the Lets Encrypt template, uncomment below to get a free SSL certificate
  #LETSENCRYPT_ACCOUNT_EMAIL: me@example.com

  ## The http or https CDN address for this Discourse instance (configured to pull)
  ## see https://meta.discourse.org/t/14857 for details
  #DISCOURSE_CDN_URL: https://discourse-cdn.example.com

  ## The maxmind geolocation IP address key for IP address lookup
  ## see https://meta.discourse.org/t/-/137387/23 for details
  ## DISCOURSE_MAXMIND_LICENSE_KEY: xxxxxxxxxxxxxxxx

## The Docker container is stateless; all data is stored in /shared
volumes:
  - volume:
      host: /var/discourse/shared/standalone3
      guest: /shared
  - volume:
      host: /var/discourse/shared/standalone3/log/var-log
      guest: /var/log

## Plugins go here
## see https://meta.discourse.org/t/19157 for details
hooks:
  after_code:
    - exec:
        cd: $home/plugins
        cmd:
          - git clone https://github.com/discourse/docker_manager.git
          - git clone https://github.com/discourse/discourse-ai.git
          - git clone https://github.com/merefield/discourse-ai-topic-summary.git
          - git clone https://github.com/discourse/discourse-akismet.git
          - git clone https://github.com/discourse/discourse-bbcode.git
          - git clone https://github.com/discourse/discourse-categories-suppressed.git
          - git clone https://github.com/discourse/discourse-characters-required.git
          - git clone https://github.com/discourse/discourse-docs.git
          - git clone https://github.com/discourse/discourse-follow.git
          - git clone https://github.com/MonDiscourse/discourse-formatting-toolbar.git
          - git clone https://github.com/discourse/discourse-gamification.git
          - git clone https://github.com/paviliondev/discourse-group-directory.git
#          - git clone https://github.com/discourse/discourse-group-tag-associations.git
          - git clone https://github.com/discourse/discourse-group-tracker.git
          - git clone https://github.com/paviliondev/discourse-journal.git
          - git clone https://github.com/discourse/discourse-nested-posts.git
          - git clone https://github.com/paviliondev/discourse-news.git
          - git clone https://github.com/thoka/discourse-send-pdf-inline.git
          - git clone https://github.com/discourse/discourse-prepend-tags-in-topic-slug.git
          - git clone https://github.com/discourse/discourse-preset-topic-composer.git
          - git clone https://github.com/discourse/discourse-reactions.git
          - git clone https://github.com/discourse/discourse-restricted-replies.git
          - git clone https://github.com/discourse/discourse-rss-polling.git
          - git clone https://github.com/discourse/discourse-saved-searches.git
          - git clone https://github.com/discourse/discourse-solved.git
          - git clone https://github.com/discourse/discourse-staff-alias.git
          - git clone https://github.com/discourse/discourse-subscriptions.git
          - git clone https://github.com/discourse/discourse-surveys.git
          - git clone https://github.com/discourse/discourse-templates.git
          - git clone https://github.com/discourse/discourse-tooltips.git
          - git clone https://github.com/discourse/discourse-topic-voting.git
          - git clone https://github.com/merefield/discourse-word-cloud.git
          - git clone https://github.com/communiteq/discourse-private-replies.git

## Any custom commands to run after building
run:
  - exec: echo "Beginning of custom commands"
  - exec: rails r "SiteSetting.max_category_nesting=3"
  - exec: rails r "SiteSetting.allow_embedding_site_in_an_iframe=true"
  - exec: rails r "SiteSetting.can_permanently_delete=true"
  ## If you want to set the 'From' email address for your first registration, uncomment and change:
  ## After getting the first signup email, re-comment the line. It only needs to run once.
  #- exec: rails r "SiteSetting.notification_email='info@unconfigured.discourse.org'"
  - exec: echo "End of custom commands"
2024-10-23 Jen's Sample Vhost Contents for app3
server {
#  listen 80;
#  listen [::]:80;
  listen 443 ssl http2;
  listen [::]:443 ssl http2;
  {{ssl_certificate_key}}
  {{ssl_certificate}}
  server_name www.discourse.pub;
  return 301 https://discourse.pub$request_uri;
}

server {
#  listen 80;
#  listen [::]:80;
  listen 443 ssl http2;
  listen [::]:443 ssl http2;
  {{ssl_certificate_key}}
  {{ssl_certificate}}
  server_name discourse.pub www1.discourse.pub;
  {{root}}

  {{nginx_access_log}}
  {{nginx_error_log}}

  if ($scheme != "https") {
    rewrite ^ https://$host$uri permanent;
  }

  location @reverse_proxy {
    proxy_pass {{reverse_proxy_url}};
    proxy_http_version 1.1;
    proxy_set_header X-Forwarded-Host $host;
    proxy_set_header X-Forwarded-Server $host;
    proxy_set_header X-Real-IP $remote_addr;
    proxy_set_header X-Forwarded-For $proxy_add_x_forwarded_for;
    proxy_set_header X-Forwarded-Proto $scheme;
    proxy_set_header Host $http_host;
    proxy_set_header Upgrade $http_upgrade;
    proxy_set_header Connection "Upgrade";
    proxy_pass_request_headers on;
    proxy_max_temp_file_size 0;
    proxy_connect_timeout 900;
    proxy_send_timeout 900;
    proxy_read_timeout 900;
    proxy_buffer_size 128k;
    proxy_buffers 4 256k;
    proxy_busy_buffers_size 256k;
    proxy_temp_file_write_size 256k;
  }

  {{settings}}

  add_header Cache-Control no-transform;

  location / {
                proxy_pass http://unix:/var/discourse/shared/standalone3/nginx.http.sock:;
                proxy_set_header Host $http_host;
                proxy_http_version 1.1;
                proxy_set_header X-Forwarded-For $proxy_add_x_forwarded_for;
                proxy_set_header X-Forwarded-Proto $scheme;
                proxy_set_header X-Real-IP $remote_addr;

  }
}
In nano editor, to select all
If you want to select all the text and all the lines of the file in Nano, here’s what you need to do:
- Press
Alt+\and jump to the start of the file. - Press
Ctrl+6to set the marker. - Press
Alt+/to move to the end of the file.